OTP, Module and Slurm
Table of contents
快速取得OTP的作法
- OTP的輸入需要在瀏覽器登入國網、進入主機管理網頁、按下「顯示」、並且在30秒內執行點選(double click)、Ctrl-C複製、切回ssh登入界面、Ctrl-V貼上,過程還蠻緊張的,貼慢一點就得重來。
- 教材中提到國網OTP的相機掃描功能(設定如下圖1),是利用瀏覽器自動填入密碼提供的方便門
- 有Microsoft會員帳號的用戶,使用Edge及Authenticator for Microsoft Edge
- 使用google帳戶及Chrome者,下載authenticator擴充套件 ,Firefox則要下載另外的套件
- 下載Authenticator後、在瀏覽器設定處(右上方選單)啟用該延伸功能
- 點選圖2的icon後會告知還沒有設定使用者帳號
- 點選[-]方塊(掃描QR code)將國網右上方二維條碼納入
- 內容為登入使用者名稱
- 只需執行一次
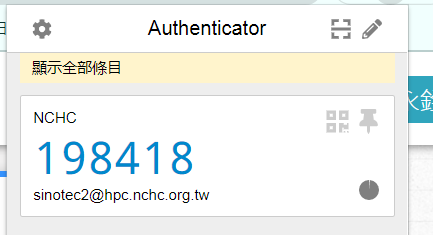
- 點選右上方二維條碼icon(圖2)便可隨時顯示6位數OTP(圖3),點一次即複製。
- 下次就不必再登入國網的網頁
- 只需登入瀏覽器google/firefox/microsoft會員)
- 藍色數字表示正常
- 如果出現紅字表示最後3秒鐘、可以等等、再點一次
- 再到ssh登入對話框,貼上(shift-Insert)數字即可
- 點選圖2的icon後會告知還沒有設定使用者帳號
 |
|---|
| 圖1以手機相機取得國網OTP並由Edge自動填入 |
- 啟動延伸套件後,在瀏覽器右上方會出現套件的icon(小二維碼)
 |
|---|
| 圖2啟動Chrome Authenticator擴充套件後右上方出現icon |
- 登記使用者及網域後,點選icon後就會出現6位數字。只要在數字上點選1次就會複製到剪貼簿。
 |
|---|
| 圖3Chrome顯示6位數OTP,只需在數字上點1次即複製到剪貼簿 |
Usage of module commands
+-----------------------------------------------------------------------------+
|                        Module Command Usage Information                     |
+-----------------------------------------------------------------------------+
|         Command          |           Module Comamnd Description             |
+-----------------------------------------------------------------------------+
|   $ module load [...]    |   load module(s)                                 |
|   $ module unload [...]  |   Remove module(s)                               |
|   $ module purge         |   unload all modules                             |
|   $ module list          |   List loaded modules                            |
|   $ module avail         |   List available modules                         |
|   $ module whatis module |   Print whatis information about module          |
|   $ module keyword string|   Search all name and whatis that contain string |
+-----------------------------------------------------------------------------+
modules in intel.sh
- 須按照順序載入環境
- 主要影響PATH及LD_LIBRARY_PATH等2個環境變數
module load compiler/intel/2021
module load IntelMPI/2021
module load hdf5/1.12
module load netcdf/4.7.4
module load pnetcdf/1.12.2
- 因遇記憶體不足問題(如下),module load還不如直接設定LD_LIBRARY_PATH,啟用下列5個目錄的程式庫即可。
#sinotec2@lgn303 ~/cmaq_recommend/1901
#$ head buff_CMAQ_CCTMv532_sinotec2_20220416_150403_523992255.txt
[1650121445.321789] [cpn3286:242769:0]          select.c:514  UCX  ERROR   no active messages transport to <no debug data>: posix/memory - Destination is unreachable, sysv/memory - Destination is unreachable, self/memory0 - Destination is unreachable, cma/memory - no am bcopy, knem/memory - no am bcopy
#$ source ~/cmaq_recommend/exec.sh
#$ cat ~/cmaq_recommend/exec.sh
#!/bin/bash
P0=/opt/ohpc/Taiwania3/libs/Iimpi-2021/hdf5-1.12/lib:/opt/ohpc/Taiwania3/libs/Iimpi-2021/szip-2.1.1/lib
P1=/opt/ohpc/Taiwania3/libs/Iimpi-2020/pnetcdf-1.12.2/lib
P2=/opt/ohpc/Taiwania3/pkg/cmp/compilers/intel/compilers_and_libraries_2017.7.259/linux/compiler/lib/intel64_lin
P3=/opt/ohpc/Taiwania3/libs/Iimpi-2021/netcdf-4.7.4/lib
P4=/opt/ohpc/Taiwania3/libs/libfabric/1.11.2/lib
LD_LIBRARY_PATH=${P0}:${P1}:${P2}:${P3}:${P4}
python
- @clogin2
- module load biology/Python3/default
- 為py37
- @lgn303
module purge
module load pkg/Anaconda3
module load pkg/Python/3.9.7

# first time installation
cd $Performance
conda env create Evaluate

# each time activation
conda activate Evaluate
- 另有py37
- 執行時必須加註版本(python3),否則會啟動python2 (/usr/bin/python)
rcec及地理資訊相關模組
- rcec以下有許多常用模組,如
| modulename | version | usage |
|---|---|---|
| ncl | 6.6.2 | ncl, ncl_convert |
| python | wrfpost | ncdump/ncgen/tiff* |
- 地理資訊方面
- libs/gdal/3.4.1
- libs/geos/3.9.2
- libs/proj/7.2.1
其它可用模組
$ module avail
Where:
D:  Default Module

Use "module spider" to find all possible modules.
Use "module keyword key1 key2 ..." to search for all possible modules matching any of the "keys".
bash腳本中執行module及mpirun
- module load指令會啟動需要的環境設定,包括執行模式需要的
$PATH、$LD_LIBRARY_PATH等,不必另外再設定。 - 如以下腳本,可以直接用sbatch啟動
#!/bin/bash
#SBATCH -A ENT111040             # Account name/project number
#SBATCH -J wrf                   # Job name
#SBATCH -p ct224                 # Partiotion name
#SBATCH -n 120                   # Number of MPI tasks (i.e. processes)
#SBATCH -c 1                     # Number of cores per MPI task
#SBATCH -N 3                     # Maximum number of nodes to be allocated
#SBATCH --ntasks-per-node=40     # Maximum number of tasks on each node
#SBATCH -o rsl.out.%j            # Path to the standard output file
#SBATCH -e rsl.error.%j          # Path to the standard error ouput file

module load compiler/intel/2021 IntelMPI/2021 hdf5/1.12 netcdf/4.7.4 pnetcdf/1.12.2

mpiexec.hydra -bootstrap slurm -n 120 ~/MyPrograms/wrf_install_intel/WRF-4.2.1/main/real.exe
#SBATCH並非註記,而是slurm的directory,以其為首的內容將會控制後面的slurm執行方式。- 如範例所示,裝置模組後,路徑中就會出現mpiexec.hyda(mpirun),以及hdf5、netcdf等等程式庫。
csh 中執行module
- 因module並不是一個執行檔,而是一函數組(function),因此如果切換到其他的shell時,要重新設定,否則會找不到指令。參segmentfault
- 在bash、其內容為
$ type module
module is a function
module ()
{
    eval $($LMOD_CMD bash "$@") && eval $(${LMOD_SETTARG_CMD:-:} -s sh)
}
- 基本上module這個函數會執行2個動作,一個是
$LMOD_CMD bash "$@"所產出(打印)所有模組有關的內容,包括路徑及環境變數(參printenv),然後再以此環境設定的組合,啟動原來的shell。 - 在csh的語法有些不同,在csh中module是個別名、用意相同,定義如下:
[sinotec2@lgn303 forecast]$ which module
module:          aliased to eval `$LMOD_CMD tcsh  !*`  && eval `$LMOD_SETTARG_CMD -s csh`
- 因此如果在csh的腳本中要執行module load指令,可以直接寫成:
eval `$LMOD_CMD tcsh load compiler/intel/2021 IntelMPI/2021 hdf5/1.12 netcdf/4.7.4 pnetcdf/1.12.2`  && \
eval `$LMOD_SETTARG_CMD -s csh`
- 在csh環境中,
!*指得就是$LMOD_CMD tcsh之後所有的引數,類似bash中的$@$LMOD_CMD就是/opt/ohpc/admin/lmod/lmod/libexec/lmod- 前半個指令會將所有模組需要的路徑等等環境設定都打印出來,因此
eval就會將其執行,將打印內容設成環境變數。
$LMOD_SETTARG_CMD是個冒號,在eval之後,會將之前的環境變數傳到其後的shell中,詳見chatGPT的解釋。
slurm commands
- slurm是全球超級電腦或叢集電腦常用的資源調度工具,也為國網所採用。
簡易指令 screen類似tmux可以設置特定slurm環境
+-----------------------------------------------------------------------------+
|                   Resource Manager Command Usage Information                |
+-----------------------------------------------------------------------------+
|         Command          |                SLURM                             |
+-----------------------------------------------------------------------------+
| Submit batch jobl        | sbatch [job script]                              |
| Request interactive shell| srun –pty /bin/bash                              |
| Delete job               | scancel [job id]                                 |
| Queue status             | sinfo                                            |
| Job status               | scontrol show job [job id]                       |
| Node status              | scontrol show node [NodeID]                      |
+-----------------------------------------------------------------------------+
SBATCH
- $1=200
- $2=run.cctm.03.csh
#sinotec2@lgn301 ~/cmaq_recommend/1901
#$ cat ~/bin/gorun.sh

pro="ENT111046"
queue="ct224"

sbatch --get-user-env --account=$pro --job-name=cmaqruns --partition=${queue} --ntasks=${1} --cpus-per-task=1 --nodes=5 --ntasks-per-node=40  ${2}
SQUEUE
squeue|grep 'NAME|$USERNAME'
$ squeue|H
  JOBID PARTITION     NAME     USER ST       TIME  NODES NODELIST(REASON)
1403160      ct56 st_archi minhuilo PD       0:00      1 (Dependency)
1403488      ct56       C1 ericente  R       0:30      1 cpn3605
1386477      ct56     vasp u9576505  R   17:07:56      1 cpn3166
1376874      ct56 Sheet-A1 bnbmax00  R 2-19:40:55      1 cpn3014
1370483      ct56 StraL7e- jimmy081  R 3-21:18:00      1 cpn3185
1372350      ct56  noP.txt jimmy081  R 3-16:12:19      1 cpn3062
1385787      ct56     vasp percy097  R   20:10:41      1 cpn3168
1376233     ct224 testGoPa u8926524  R 2-22:08:57      3 cpn[3493-3495]
1403119      ct56 config-S u5411358  R    1:23:47      1 cpn3020
SCONTROL
#scontrol show job $j
SREPORT
Workload Characterization Key (WCKey)
#$ sreport cluster AccountUtilizationByUser All_Clusters accounts=ent111046 start=4/15/22 end=4/17/22 format=Accounts,Cluster,TresCount,Login,Proper,Used

--------------------------------------------------------------------------------
    Cluster/Account/User Utilization 2022-04-15T00:00:00 - 2022-04-16T23:59:59 (172800 secs)
    Usage reported in CPU Minutes
--------------------------------------------------------------------------------
        Account   Cluster TRES Count     Login     Proper Name     Used
--------------- --------- ---------- --------- --------------- --------
      ent111046 taiwania3          0                               5218
      ent111046 taiwania3          0  sinotec2        sinotec2     5218
#sreport job sizesbyaccount accounts=ent111046 start=4/15/22 end=4/17/22
--------------------------------------------------------------------------------
    Job Sizes 2022-04-15T00:00:00 - 2022-04-16T23:59:59 (172800 secs)
    Time reported in Minutes
--------------------------------------------------------------------------------
      Cluster   Account     0-49 CPUs   50-249 CPUs  250-499 CPUs  500-999 CPUs  >= 1000 CPUs % of cluster
--------- --------- ------------- ------------- ------------- ------------- ------------- ------------
    taiwania3 ent111046             0          5176            42             0             0      100.00%
slurm-$JOB_ID.out
- 為執行檔的standard output,會從一開始執行就累積
- 相對的CTM*只會記錄每日的print_out,檔案較小
- 可以用grepDDD檢視進度
#$ cat ~/bin/grepDDD
grep -n DDD $(ls -rt CTM*|tail)|tail -n1
printenv
env settings about MPI
sinotec2@lgn303 ~
$ printenv|grep MPI
LMOD_FAMILY_COMPILER_VERSION=2021
MPI_F77=/opt/ohpc/Taiwania3/pkg/intel/2021/mpi/2021.1.1/bin/mpiifort
MPI_CXX=/opt/ohpc/Taiwania3/pkg/intel/2021/mpi/2021.1.1/bin/mpiicpc
MPI_FC=/opt/ohpc/Taiwania3/pkg/intel/2021/mpi/2021.1.1/bin/mpiifort
MPICC=/opt/ohpc/Taiwania3/pkg/intel/2021/mpi/2021.1.1/bin/mpiicc
I_MPI_FABRICS=shm:ofi
__LMOD_REF_COUNT_LOADEDMODULES=compiler/intel/2021:1;libs/ucx/1.11.2:1;IntelMPI/2021:1;szip/2.1.1:1;hdf5/1.12:1;netcdf/4.7.4:1;pnetcdf/1.12.2:1;libs/OFI/libfabric/1.11.2:1
__LMOD_REF_COUNT__LMFILES_=/opt/ohpc/Taiwania3/modulefiles/compiler/intel/2021.lua:1;/opt/ohpc/Taiwania3/modulefiles/libs/ucx/1.11.2.lua:1;/opt/ohpc/Taiwania3/pkg/lmod/comp/intel/2021/IntelMPI/2021.lua:1;/opt/ohpc/Taiwania3/pkg/lmod/mpi/intel/2021/szip/2.1.1.lua:1;/opt/ohpc/Taiwania3/pkg/lmod/mpi/intel/2021/hdf5/1.12.lua:1;/opt/ohpc/Taiwania3/pkg/lmod/mpi/intel/2021/netcdf/4.7.4.lua:1;/opt/ohpc/Taiwania3/pkg/lmod/mpi/intel/2021/pnetcdf/1.12.2.lua:1;/opt/ohpc/Taiwania3/modulefiles/libs/OFI/libfabric/1.11.2.lua:1
LMOD_FAMILY_MPI_VERSION=2021
_LMFILES_=/opt/ohpc/Taiwania3/modulefiles/compiler/intel/2021.lua:/opt/ohpc/Taiwania3/modulefiles/libs/ucx/1.11.2.lua:/opt/ohpc/Taiwania3/pkg/lmod/comp/intel/2021/IntelMPI/2021.lua:/opt/ohpc/Taiwania3/pkg/lmod/mpi/intel/2021/szip/2.1.1.lua:/opt/ohpc/Taiwania3/pkg/lmod/mpi/intel/2021/hdf5/1.12.lua:/opt/ohpc/Taiwania3/pkg/lmod/mpi/intel/2021/netcdf/4.7.4.lua:/opt/ohpc/Taiwania3/pkg/lmod/mpi/intel/2021/pnetcdf/1.12.2.lua:/opt/ohpc/Taiwania3/modulefiles/libs/OFI/libfabric/1.11.2.lua
MPI_CC=/opt/ohpc/Taiwania3/pkg/intel/2021/mpi/2021.1.1/bin/mpiicc
MPIFC=/opt/ohpc/Taiwania3/pkg/intel/2021/mpi/2021.1.1/bin/mpiifort
LOADEDMODULES=compiler/intel/2021:libs/ucx/1.11.2:IntelMPI/2021:szip/2.1.1:hdf5/1.12:netcdf/4.7.4:pnetcdf/1.12.2:libs/OFI/libfabric/1.11.2
I_MPI_VAR_CHECK_SPELLING=no
I_MPI_OFI_PROVIDER=mlx
MPIF77=/opt/ohpc/Taiwania3/pkg/intel/2021/mpi/2021.1.1/bin/mpiifort
I_MPI_HYDRA_BOOTSTRAP=slurm
LMOD_FAMILY_COMPILER=compiler/intel
LMOD_FAMILY_MPI=IntelMPI
MPICXX=/opt/ohpc/Taiwania3/pkg/intel/2021/mpi/2021.1.1/bin/mpiicpc
I_MPI_ROOT=/opt/ohpc/Taiwania3/pkg/intel/2021/mpi/2021.1.1
provider
$ printenv|grep PROV FI_PROVIDER_PATH=/opt/ohpc/Taiwania3/pkg/intel/2021/mpi/2021.1.1/libfabric/lib/prov I_MPI_OFI_PROVIDER=mlx
$LMOD_SETTARG_CMD
請解釋$LMOD_SETTARG_CMD的內容與作用
$LMOD_SETTARG_CMD是Lmod軟件的一個環境變量,用於設置Lmod如何將軟件模塊加載到用戶的環境中。
在使用Lmod管理軟件模塊時,用戶可以使用module命令來查詢和加載模塊。而$LMOD_SETTARG_CMD則是用來設置Lmod如何設置環境變量,以便使已加載的模塊生效。
具體來說,$LMOD_SETTARG_CMD環境變量可以設置三種不同的值:
export:當$LMOD_SETTARG_CMD被設置為export時,Lmod將使用export命令將所有已加載的模塊中定義的環境變量添加到用戶的環境中。這使得這些環境變量可以在後續的命令中使用,而不需要額外的操作。
setenv:當$LMOD_SETTARG_CMD被設置為setenv時,Lmod將使用setenv命令將所有已加載的模塊中定義的環境變量添加到用戶的環境中。這也使得這些環境變量可以在後續的命令中使用。
eval:當$LMOD_SETTARG_CMD被設置為eval時,Lmod將使用eval命令來執行所有已加載的模塊中定義的命令。這樣可以更靈活地設置環境變量或執行其他命令。
總之,$LMOD_SETTARG_CMD環境變量是Lmod軟件用於設置如何將軟件模塊加載到用戶環境中的一個重要設置,它可以設置為export、setenv或eval,以便將已加載的模塊中定義的環境變量或其他命令添加到用戶的環境中。